Hooks Necessárias
SSH
Ssh-keygené uma ferramenta para criar novos pares de chaves de autenticação para SSH. Esses pares de chaves são usados para automatizar logins, single sign-on e para autenticar hosts.
Algoritmo e Tamanho de Chave
O SSH suporta vários algoritmos de chave pública para chaves de autenticação.
| Algoritmos de Chave | Descrição |
|---|---|
| rsa | Um algoritmo antigo baseado na dificuldade de fatorar números grandes. Um tamanho de chave de pelo menos 2048 bits é recomendado para RSA; 4096 bits é melhor. |
| dsa | O DSA em sua forma original não é mais recomendado. Um tamanho de chave de 1024 normalmente seria usado com ele. |
| ecdsa | Algoritmo de Assinatura Digital padronizado pelo governo dos EUA. Apenas três tamanhos de chave são suportados: 256, 384 e 521 (sic!) bits. |
| ed25519 | Algoritmo adicionado no OpenSSH. |
-
ssh-keygen -t ed25519 -C "your_email@example.com"
Generating public/private ed25519 key pair.
Enter file in which to save the key (/Users/xxxxx/.ssh/id_ed25519): /Users/horaciovasconcellos/.ssh/id_ed25519
Enter passphrase (empty for no passphrase):
Enter same passphrase again:
Your identification has been saved in /Users/xxxxx/.ssh/id_ed25519
Your public key has been saved in /Users/horaciovasconcellos/.ssh/id_ed25519.pub
The key fingerprint is:
SHA256:xIzQ7yHaWVZ4fm6yYH8EH2Zk2CBv2HeIPFKCIbW3X3I your_email@example.com
The key's randomart image is:
+--[ED25519 256]--+
|    ooooo.o+     |
|     oo=.O+.+.   |
|      o.B+Boo .  |
|      .o=+oo=.   |
|     o *S..BE.   |
|    . o +..+=    |
|       . o.=     |
|          o .    |
|           .     |
+----[SHA256]-----+
pbcopy < ~/.ssh/id_ed25519.pub Generating a GPG key
A assinatura de um commit no Git é uma prática que garante autenticidade e integridade. Ela permite identificar de forma confiável quem fez a modificação no código, usando uma assinatura criptográfica vinculada a uma identidade digital. Aqui estão os principais motivos para assinar commits:
- Garante que o commit foi realmente feito pela pessoa que afirma tê-lo feito.
- Evita falsificações ou alterações de histórico por terceiros.
- A assinatura criptografa o conteúdo do commit, permitindo verificar que ele não foi alterado desde que foi criado.
Geração das Chaves e configuração Git
-
gpg --full-generate-key -
gpg --list-secret-keys --keyid-format=long
$ gpg --list-secret-keys --keyid-format=long /Users/hubot/.gnupg/secring.gpg ------------------------------------ sec 4096R/3AA5C34371567BD2 2030-03-10 [expires: 4712-31-12] uid Hubot <your_email@example.com> ssb 4096R/4BB6D45482678BE3 2030-03-10 -
gpg --armor --export 3AA5C34371567BD2 -
git config --global commit.gpgsign true -
git config --global user.signingkey <ID_DA_CHAVE> -
git commit -S -m "YOUR_COMMIT_MESSAGE" -
git log --show-signature
Gerando um Patch no Git
- Edite o arquivo:
nome-do-arquivo.xxx -
git diff nome-do-arquivo.xxx - Crie um arquivo de patch com o comando git diff:
git diff README.md > changes.patch - Se alguém receber o patch, pode aplicá-lo com o comando:
it apply changes.patch
Fazendo Backup Local
Se você deseja criar um repositório Git que possa ser acessado remotamente, como em um servidor ou pendrive, o processo envolve criar um repositório bare e configurá-lo para ser usado como um repositório central.
-
git clone <URL_DO_REPOSITORIO> -
cd repositorio -
ls -
git clone --bare . /media/pendrive/REPOSITORIO -
git remote add origin /media/pendrive/REPOSITORIO -
git push origin main -
Entrar no diretório ".git" e começar fazendo "git --bare update-server-info" e depois "mv hooks/- [x] post-update.sample hooks/post-update" -
python -m http.server 8000 -
Pra testar, basta ir no "/tmp" ou qualquer lugar e fazer "git clone https://localhost:8000 teste" -
ngrok http 8000
Simulando um GitFlow
Feature branch
-
git clone <URL_DO_REPOSITORIO> -
git branch develop -
git push -u origin develop -
git checkout develop -
git checkout -b feature_branch -
git checkout develop -
git merge feature_branch
Release branch
-
git checkout develop -
git checkout -b release/0.1.0 -
git checkout main -
git merge release/0.1.0
Hotfix branch
-
git checkout main -
git checkout -b hotfix_branch -
git checkout main -
git merge hotfix_branch -
git checkout develop -
git merge hotfix_branch -
git branch -D hotfix_branch
Comandos
$ git config --global user.name "User name"
$ git config --global user.email "user_name@gmail.com"
$ git config --global core.editor Vim
$ git config -list
Alias
$ git config --global alias.co checkout
$ git config --global alias.br branch
$ git config --global alias.ci commit
$ git config --global alias.st status
Inicializando
Create a local repository:
$ git init
$ git clone
$ git add Filename
$ git add *
$ git commit -m " Commit Message"
Track changes
o Git diff
Track the changes that have not been staged: $ git diff
Track the changes that have staged but not committed:
$ git diff --staged
Track the changes after committing a file:
$ git diff HEAD
Track the changes between two commits:
$ git diff Git Diff Branches:
$ git diff < branch 2>
o Git status
Display the state of the working directory and the staging area.
$ git status
o Git show Shows objects:
$ git show
Commit History
o Git log Display the most recent commits and the status of the head: $ git log Display the output as one commit per line: $ git log -oneline Displays the files that have been modified: $ git log -stat Display the modified files with location: $ git log -p o Git blame Display the modification on each line of a file: $ git blame
o Git rm Remove the files from the working tree and from the index: $ git rm ### Documentation as Code (DaC)
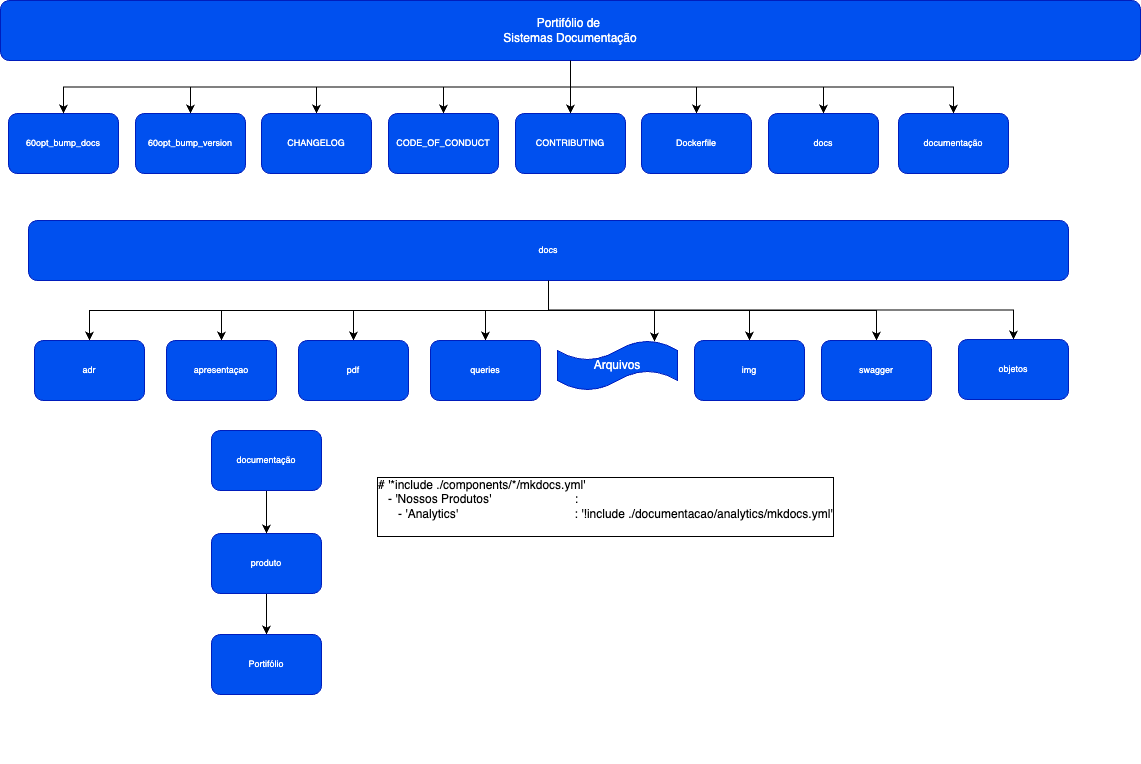
Usar um repositório de sistema de controle de versão de gerenciamento de documentaçãounificada. A ideia deste repositório é simular um monorepo significa usar um repositório,em vez de vários repositórios.
Este repositório contem um diretório de `documentacao` para os outros repositórios dedocumentação.
Como efetuar esta configuração:
- [x] `git clone https://servidor/repositorio.git`
- [x] `cd PORTIFOLIO/`
- [x] `cd documentacao/`
- [x] `git submodule add --name NOME_DO_DIRETORIO https://servidor/repositorio.gitNOME_DO_DIRETORIO`
- [x] `git submodule update --remote`
### Branches
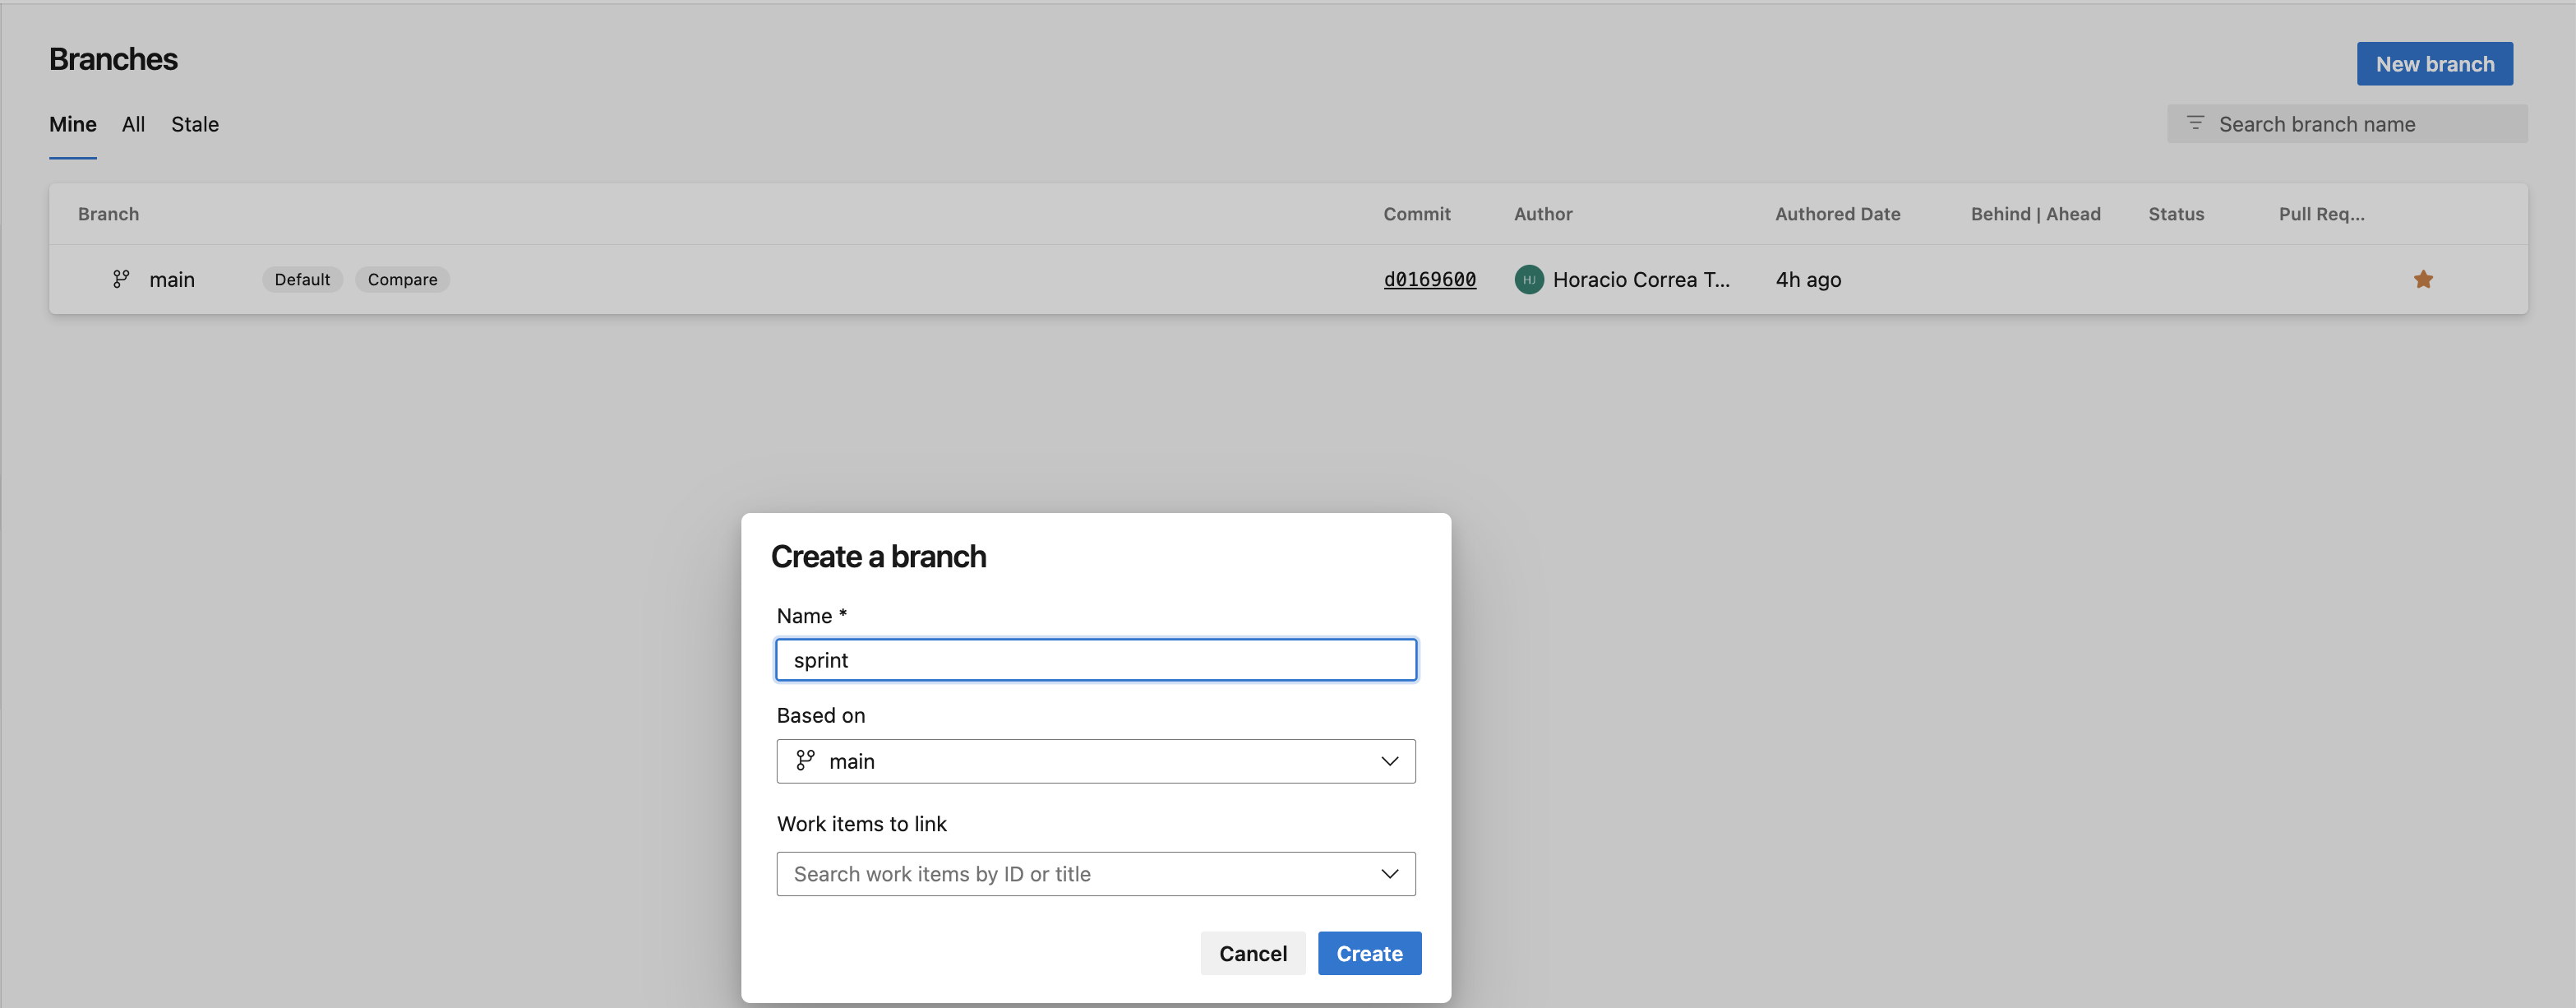
- [x] Quando o sprint começar, crie um conjunto de branches, que serão aqui discutidas.
- [x] sprint (Inicial e que deverá ser atualizado no término da Sprint)
- [x] O Tech Leader deverá efetuar a criação das branches diretamente da main;
- [x] wit|wip/ (Static Application Security Testing (SAST) e Unit Test devem ser realizados.)
- [x] wip (Working in progress): O desenvolvedor esta efetuando a criação de um objeto.
- [x] wit (Working Item): Work Item liberado para o pessoal de qualidade.
- [x] qualidade (Processo de qualidade, onde os testes: PlanTest, CyPress e Security Test (IAST(Interactive Application Security Testing), MAST(Mobile Application Security Test), DAST(Dynamic Application Security Testing)), RAST (Re Application Security Testing);

O desenvolvedor deverá efetuar o clone do repositório criado : `git clone --branch <branchname> --single-branch <remote-repo-url>`
- [x] `git clone --branch <branchname> --single-branch <remote-repo-url>`
- [x] `git clone --branch "wip/nome-feature-witnum" https://servidor/repositorio.git`
- [x] `git branch -a`
- [x] `wip/nome-feature-witnum`
- [x] `remotes/origin/HEAD -> origin/main`
- [x] `remotes/origin/main`
- [x] `remotes/origin/qualidade`
- [x] `remotes/origin/sprint`
- [x] `remotes/origin/wip/nome-feature-witnum`
- [x] `remotes/origin/wip/nome-feature-witnum`
- [x] `remotes/origin/wip/nome-feature-witnum`
- [x] `git fetch`
- [x] `git pull`
- [x] Ao terminar o desenvolvimento, o desenvolvedor deverá renomear a branch `wip` etorna-la `wit`, indicando que o mesmo foi finalizado.
- [x] `vi arquivo.txt`
- [x] `git add arquivo.txt`
- [x] `git commit -m "<feat> :sparkles: - Inclusão xxxxxxxxxxxxxxxxxxxx"`
- [x] `git push origin main`
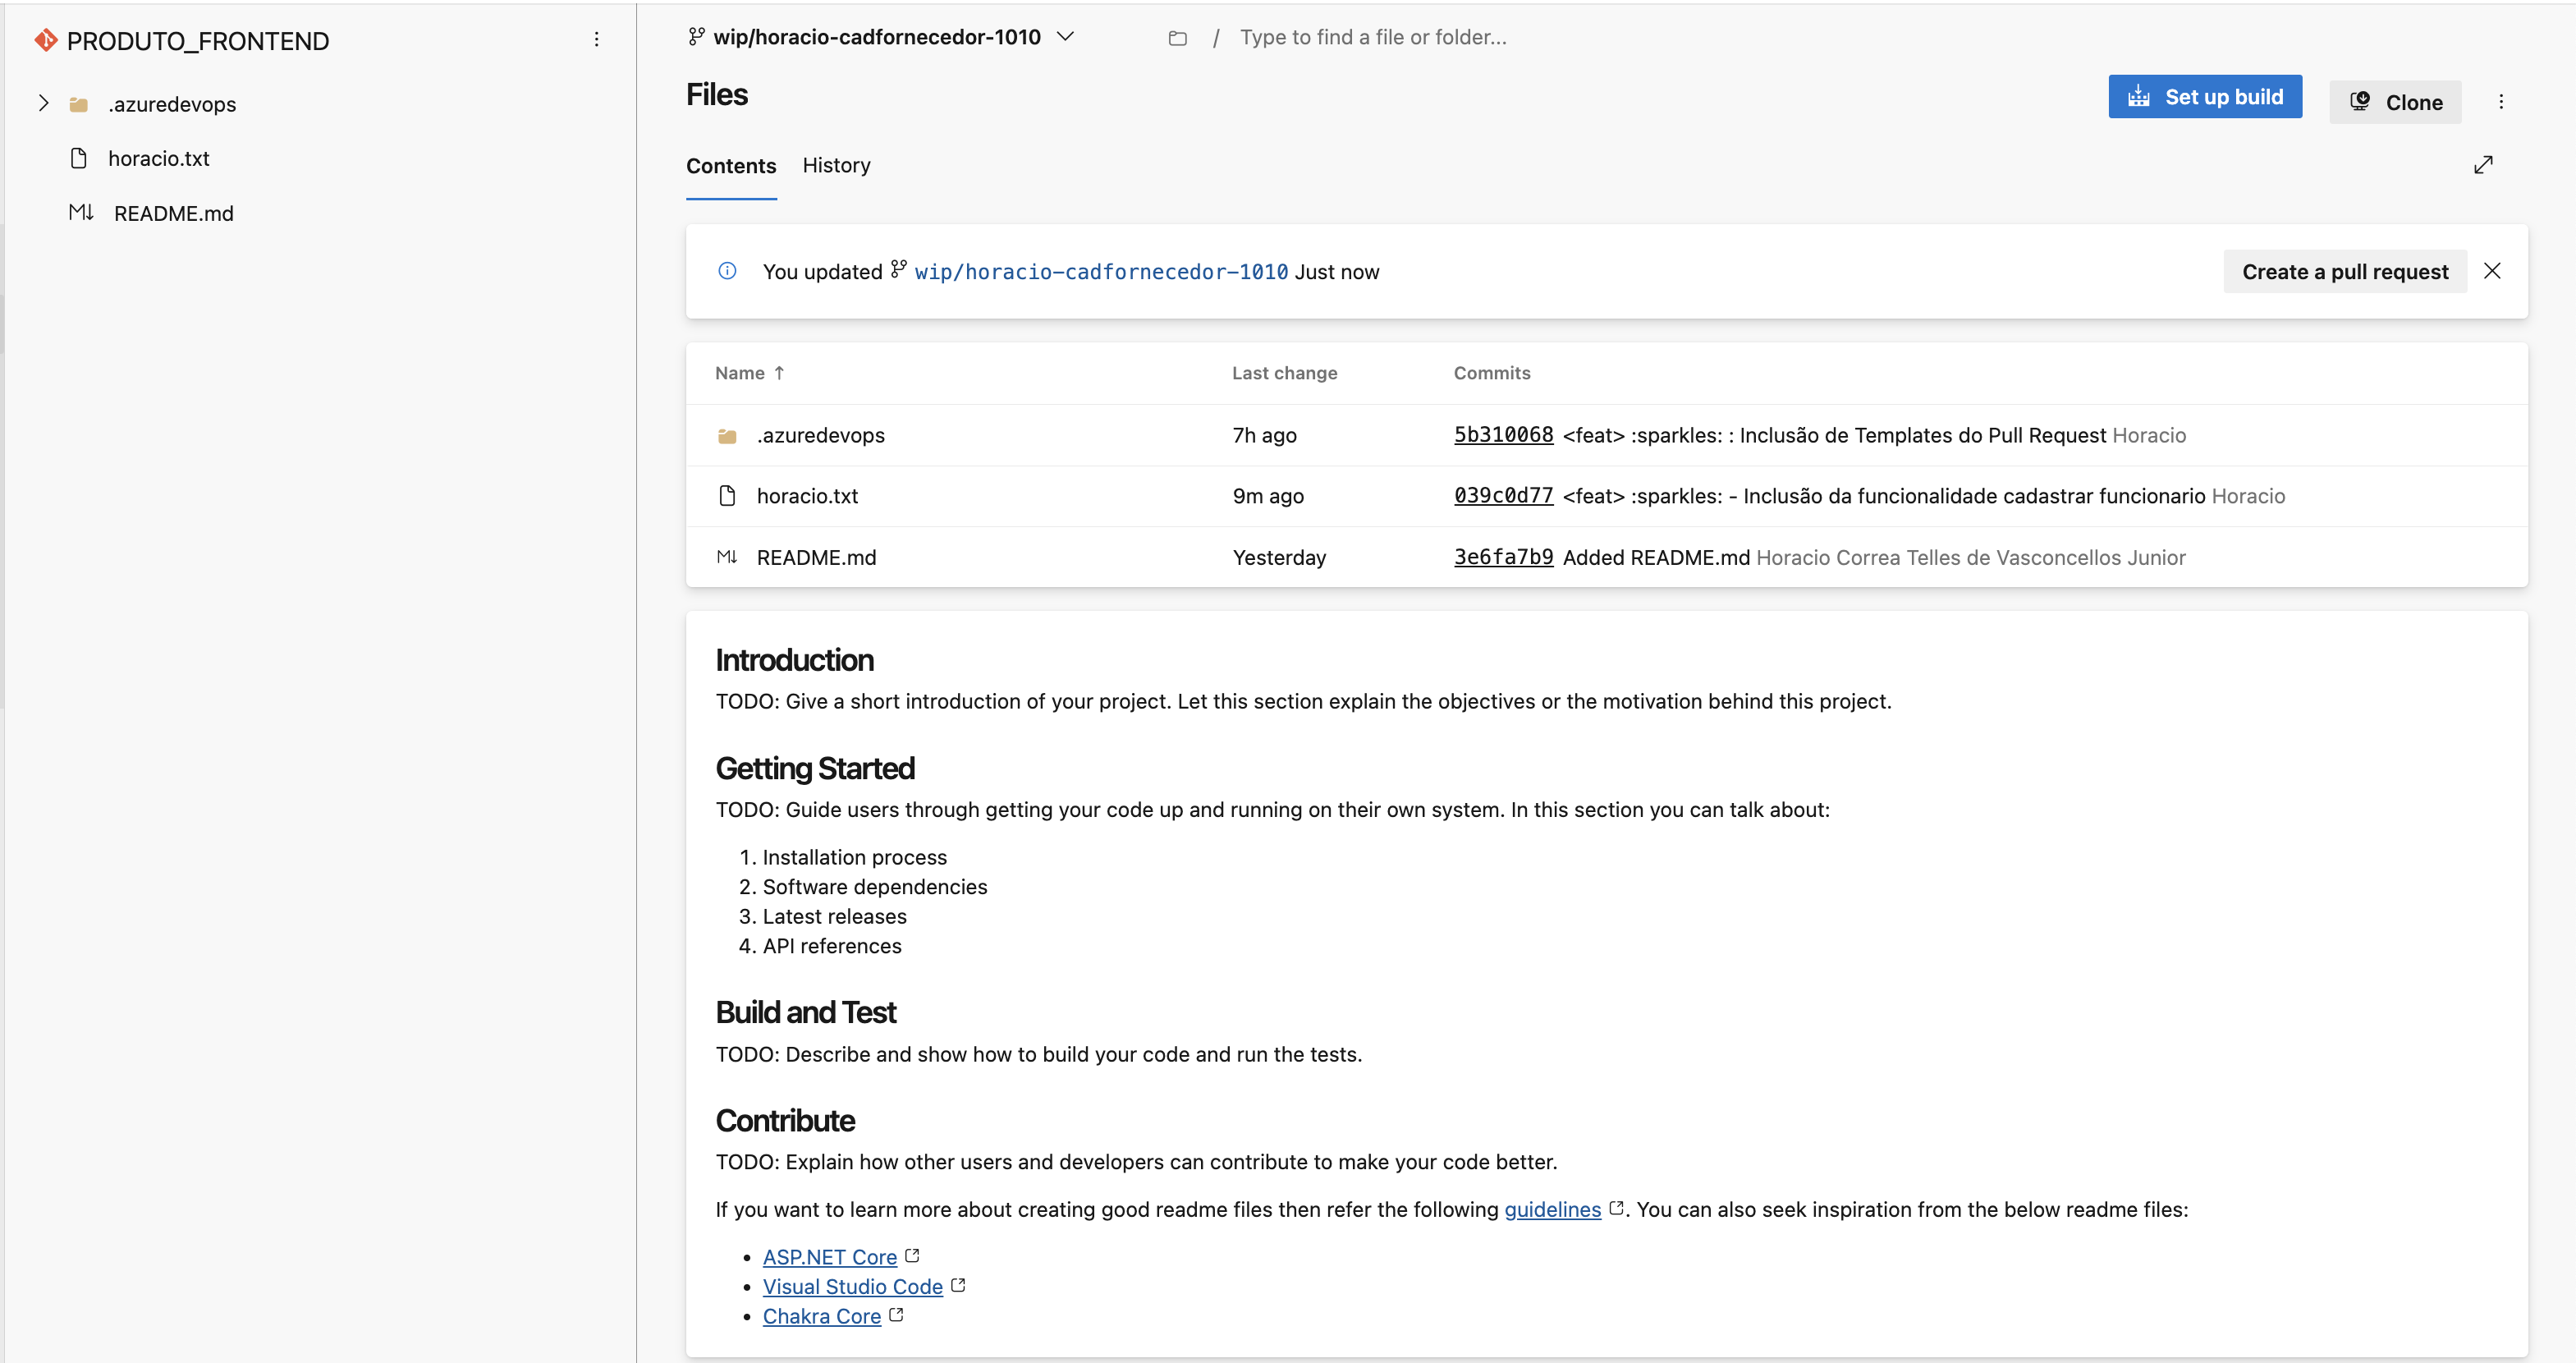
- [x] Continuei as atividades até completa-la, efetuando os Testes Unitários e devalidação. (Não demonstrarei o SAST);
- [x] Como nós terminamos o trabalho, precisamos renomear a branch;
- [x] `git branch -m "wit/nome-feature-witnum"`
- [x] `git push origin -u "wit/nome-feature-witnum"`
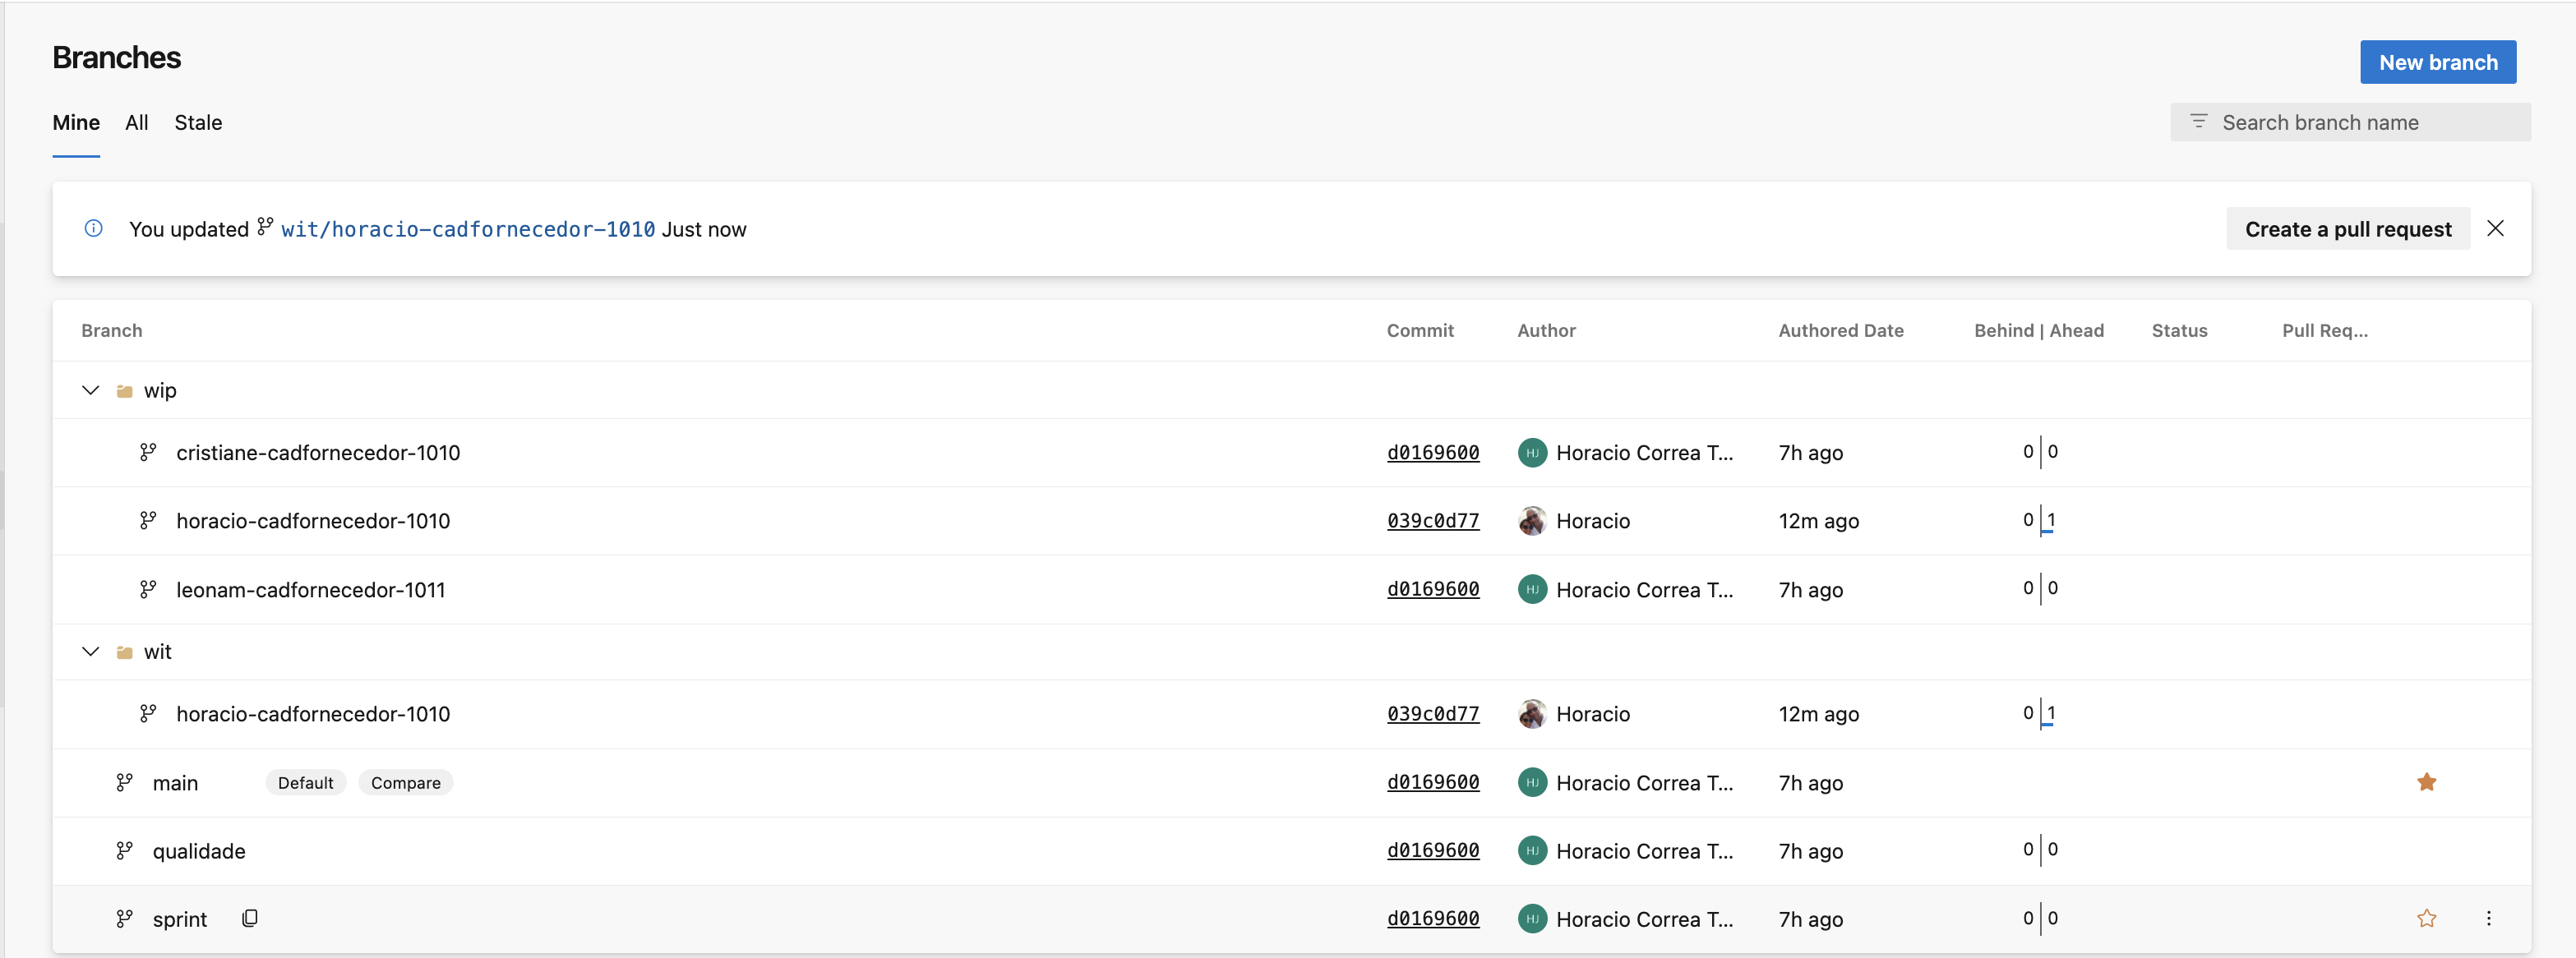
- [x] Repare que ao subir a nova branch, a antiga branch, ficou lá também, por isso há anecessidade de exclui-la do repositório.
- [x] `git push origin --delete "wip/nome-feature-witnum"`
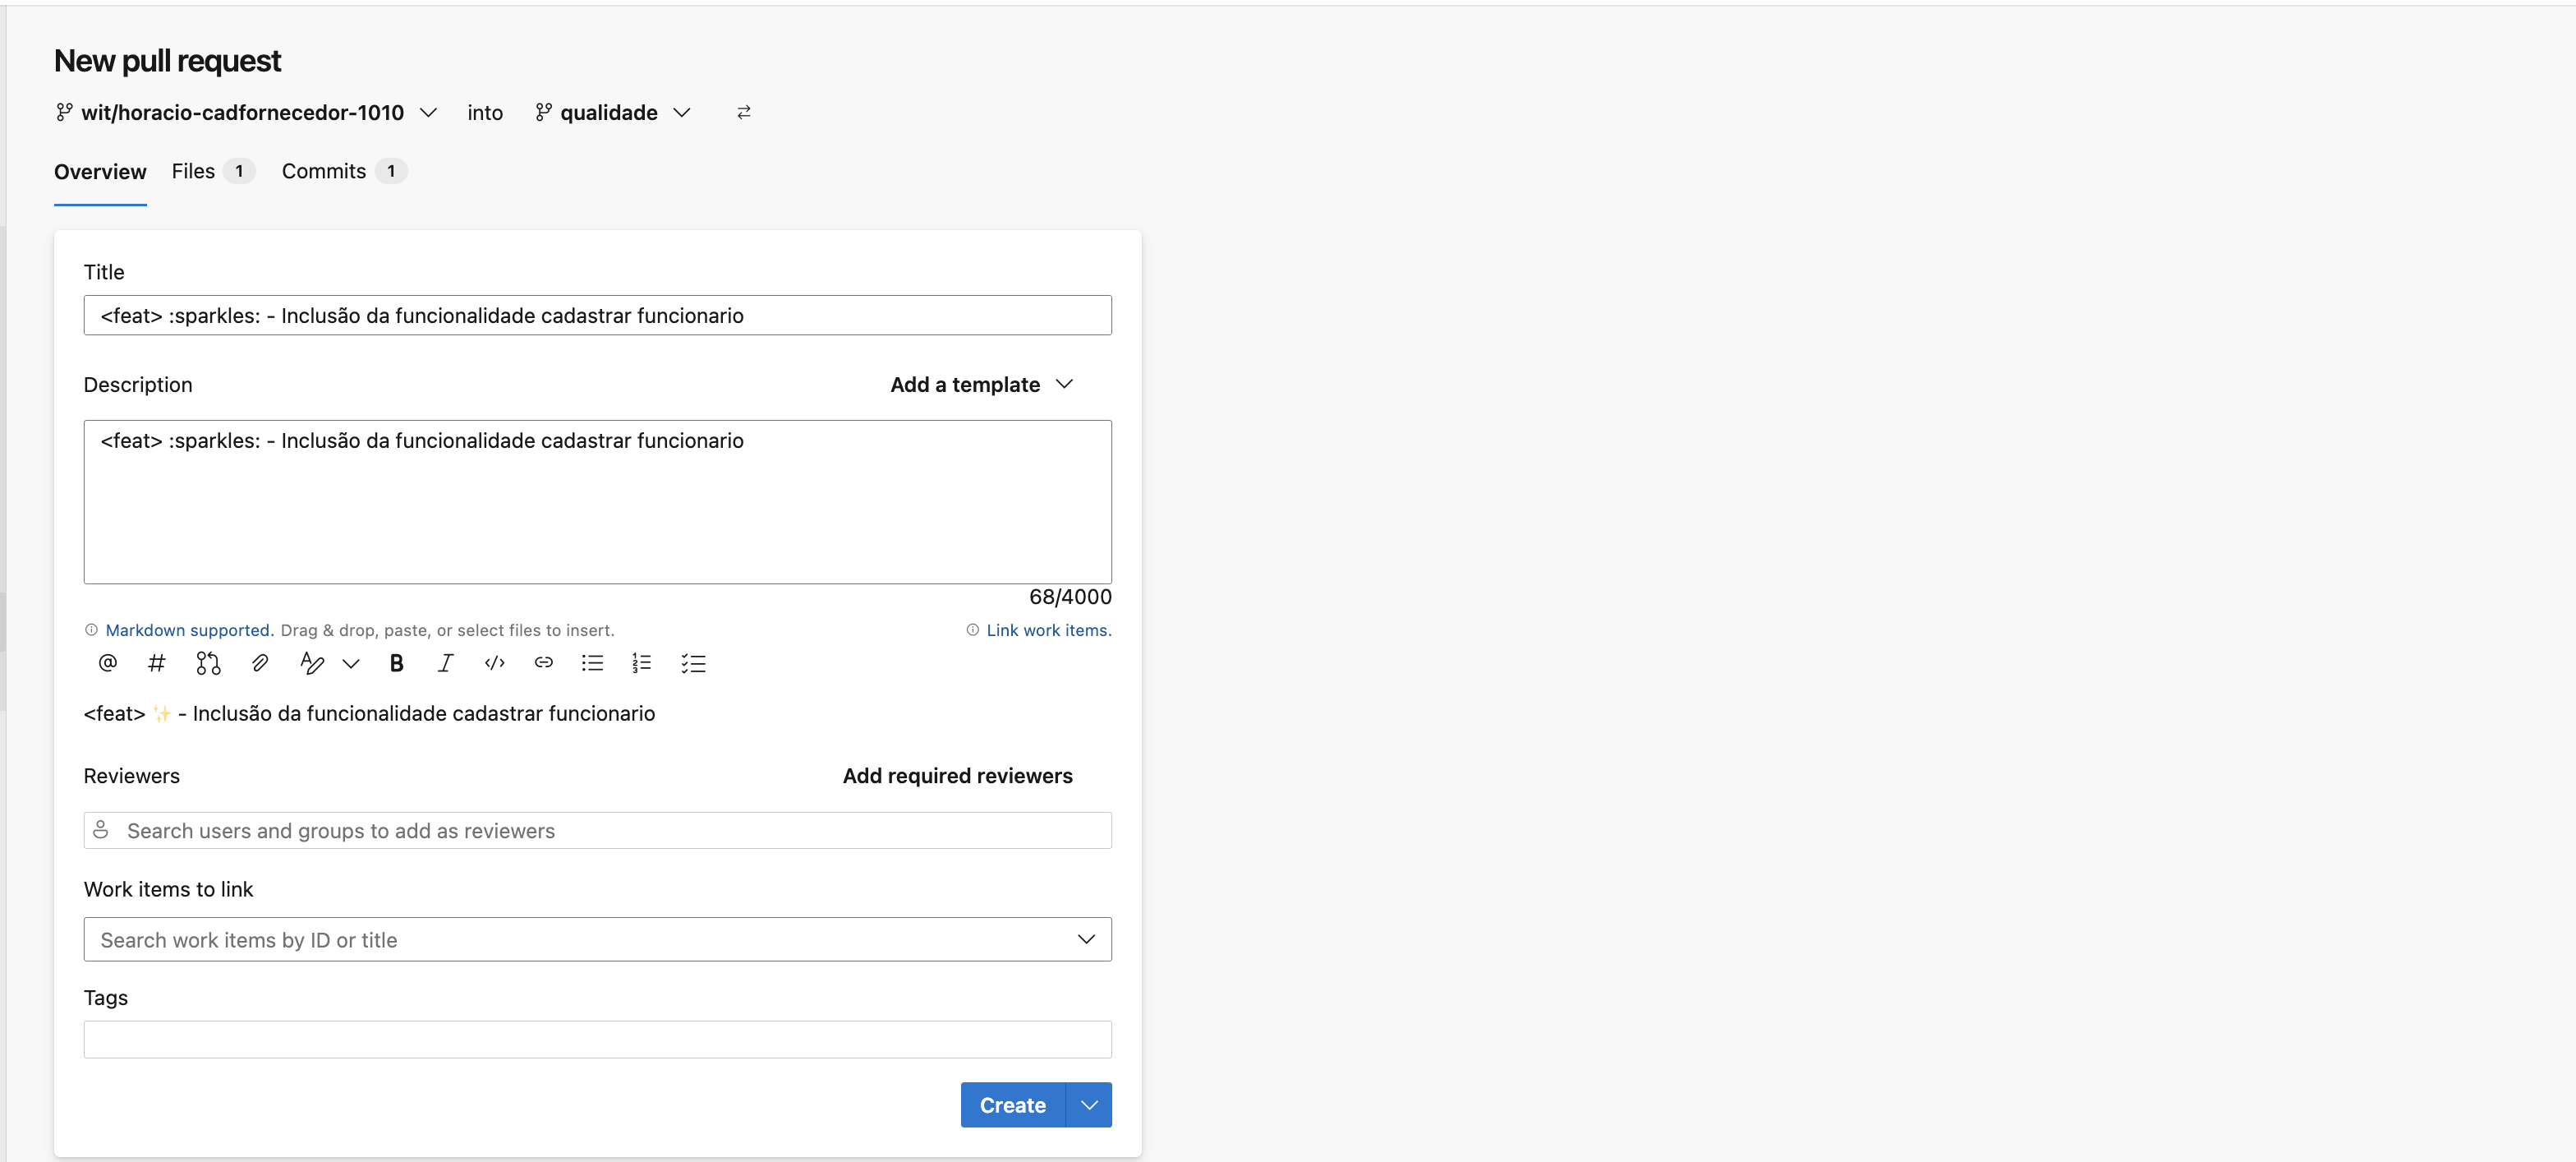
- [x] Deleta a branch de trabalho, podemos agora solicitar um Pull Request para informar aopessoal de Qualidade, que o processo, finalizou e agora há a necessidade de validação poresta equipe. O pessoal de qualidade, acatará o recebimento do Pull Request.
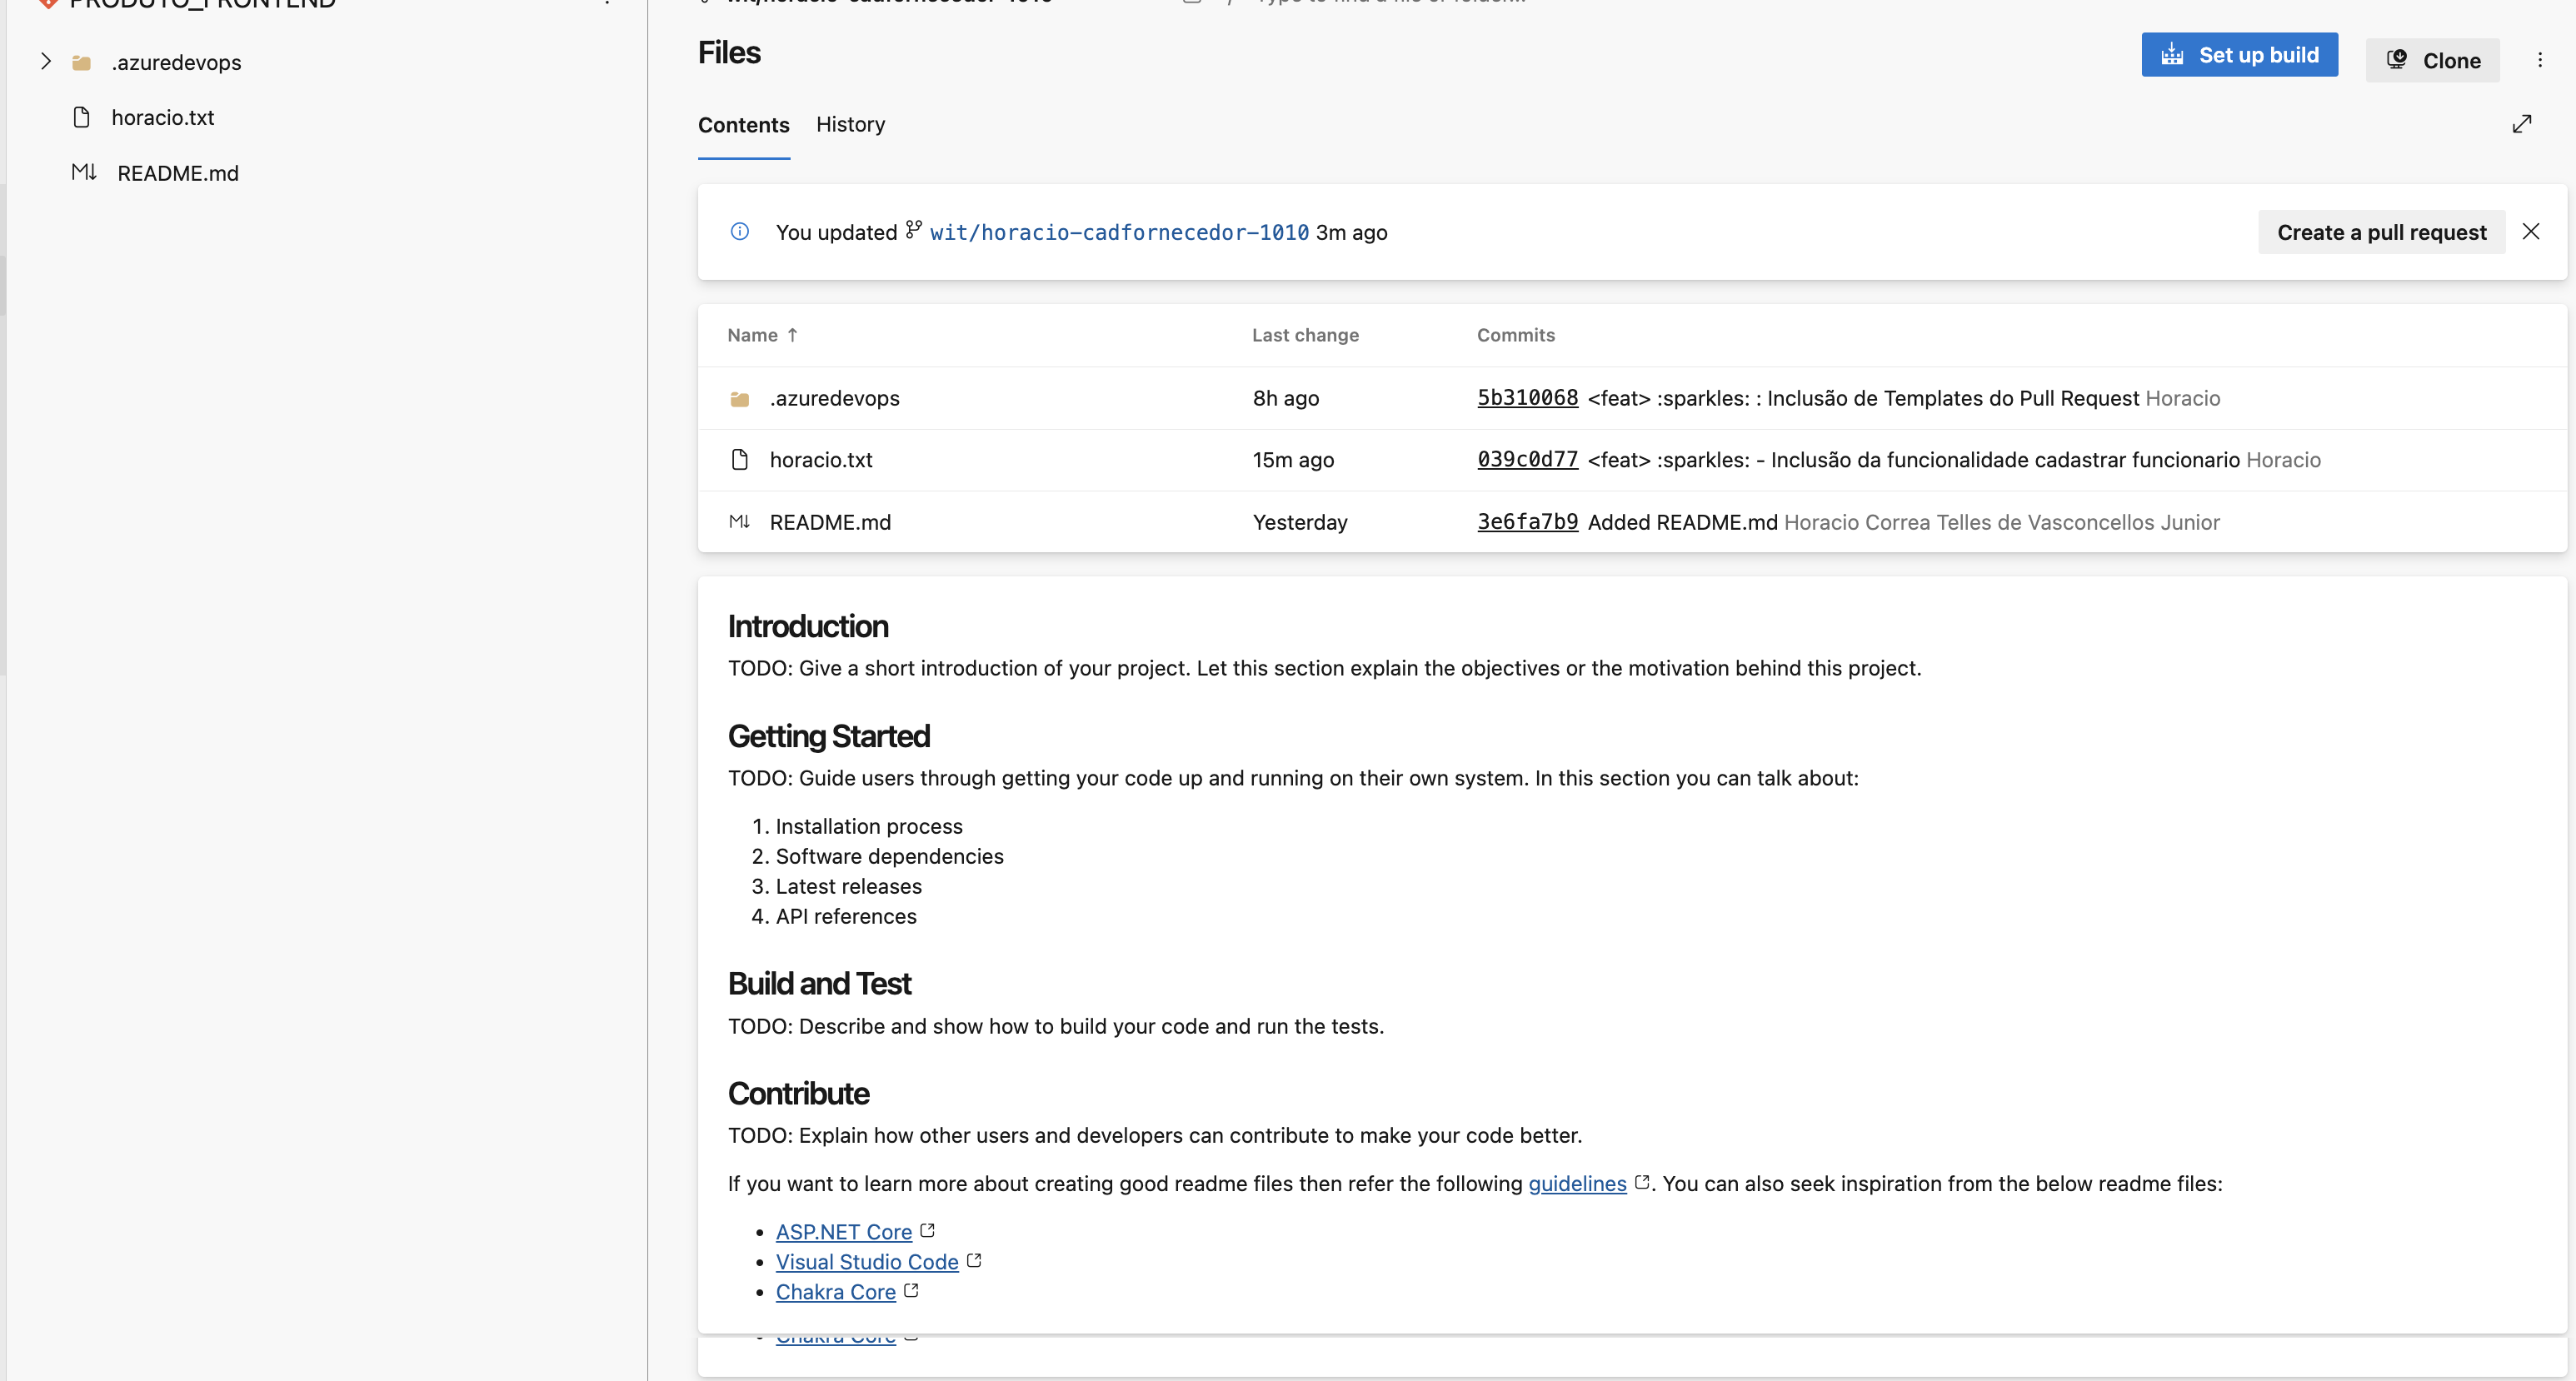
- [x] Eu esqueci de efetuar o arquivo Markdown, Qualidade e Sprint. Como NÃO havia sidocriado, podemos optar em utilizar o template pull_request_template.md
### Segurança
Imaginemos que tenhamos um repositório em: http://servidor/repositorio.git, e gostaria de alem de ter um backup no repositório central, pudesse ficar com um repositório fora do meu hd/ssd?
Efetuo a clonagem do meu repositório remoto, para um disco local de trabalho.
- [x] `git clone http://servidor/repositorio.git ou git clone --branch "main" http://servidor/repositorio.git`
Criado o repositório local, vou para o diretório criado e efetuo o clone para um outro diretório, de preferencia um pendrive ou um hd/ssd externo.
- [x] cd casa
- [x] `git clone --bare . DISCO:/repositorio.git`
Informo ao repositório, que existirão dois remotos: O origin que será o meu remoto do repositório central e um local, que será o meu backup local.
- [x] `git remote add local DISCO:/repositorio.git`
- [x] `git remote -v`
- [x] Agora vamos construir uma aplicaçõa e verificar se esta tudo de acordo, como imaginávamos.Criaremos um arquivo unico chamado horacio.txt e efetuaremos os passos normais.
vi arquivo.txt ls -al drwxr-xr-x⠀staff⠀224 ⠀Feb 1 08:37:12⠀ﱮ⠀. drwxr-xr-x⠀staff⠀1536⠀Feb 1 08:14:00⠀ﱮ⠀.. drwxr-xr-x⠀staff⠀384 ⠀Feb 1 08:27:06⠀⠀.git/ -rw-r--r--⠀staff⠀394 ⠀Feb 1 08:14:00⠀⠀.gitignore -rw-r--r--⠀staff⠀32 ⠀Feb 1 08:37:12⠀⠀arquivo.txt -rw-r--r--⠀staff⠀1077⠀Feb 1 08:14:00⠀⠀LICENSE.md -rw-r--r--⠀staff⠀13 ⠀Feb 1 08:14:00⠀⠀README.md
git add arquivo.txt git status On branch main Your branch is up to date with 'origin/main'.
Changes to be committed: (use "git restore --staged
git commit -m "
(ptb) Inclusão do arquivo arquivo.txt" [main 193b33b] (ptb) Inclusão do arquivo arquivo.txt 1 file changed, 3 insertions(+) create mode 100644 arquivo.txt git push (irá sempre mandar para o origin) Enumerating objects: 5, done. Counting objects: 100% (5/5), done. Delta compression using up to 10 threads Compressing objects: 100% (2/2), done. Writing objects: 100% (3/3), 970 bytes | 970.00 KiB/s, done. Total 3 (delta 1), reused 0 (delta 0), pack-reused 0 To http://servidor/repositorio.git 193b33b..be3129f main -> main
git push local Enumerating objects: 5, done. Counting objects: 100% (5/5), done. Delta compression using up to 10 threads Compressing objects: 100% (2/2), done. Writing objects: 100% (3/3), 970 bytes | 970.00 KiB/s, done. Total 3 (delta 1), reused 0 (delta 0), pack-reused 0 To DISCO:/repositorio.git 193b33b..be3129f main -> main ```
Recuperando o repositório perdido
Aqui é outro chopp, mas vamos iniciar explicando o que é o Ngrok. Ngrok é uma ferramenta que te permite a criação de um túnel seguro, atrás de NATs(Network Address Translation) e Firewalls, que expõem serviços locais para a Internet.
Compartilhando o diretório com outras pessoas
Entre no diretório /DISCO:/repositorio.git e execute o comando git --bare update-server-info e depois mv hooks/post-update.sample hooks/post-update.